# 快速开始
一句话把接入交给你的编码 Agent,或者在 JavaScript API 里自己动手。两种方式的结果一样,都是同样的五个部分。
## 交给你的编码 Agent
把这句话发给 Claude Code、Codex、Cursor,或任何在你仓库里工作的编码 Agent:
```text
从 https://rungent.acahti.dev/skills/rungent/SKILL.md 安装 rungent skill,然后用它把这个产品接入 rungent。
```
Agent 把 skill 存到它放 skill 的地方(`.claude/skills/rungent/`、`.agents/skills/rungent/`),然后照着做:
- 标注给用户会用到的操作加上 x-rungent。
- 身份加一个操作,告诉 rungent 当前登录的是谁。
- 挂载在你的 API 里提供 rungent,或在旁边运行 rungent serve。
- 校验在标注过的路由上检查 rungent 的签名断言。
- 面板在 Web 应用里挂上助手和页面表单。
接着它对你的 API 文档运行 `rungent check --openapi`,然后开一个 PR。你要审三件事:它暴露了哪些操作,哪些是写操作,以及中间件会不会拒绝一份错误的断言。本页其余部分是它在一个 JavaScript API 里写的内容。
## 安装
```bash
npm install rungent
```
只有一个包:运行时、React 面板、客户端、SQL 存储和 `rungent` 命令都在里面。你还需要一个模型 API Key;[部署](deploy.md#choose-models)里的任何模型链都可以。
## 标注一个读操作和一个写操作
带 `x-rungent` 的操作才会进入目录,其余路由一律不可见。用 Hono 和 `@hono/zod-openapi` 时,这个键写在路由上:
```ts
// src/api.ts
import { OpenAPIHono, createRoute, z } from '@hono/zod-openapi';
export type User = { id: string; orgId: string; name: string };
export const app = new OpenAPIHono<{ Variables: { user: User } }>();
app.use('/api/*', authenticate); // 你的登录中间件,它设置 c.var.user
const Vm = z.object({ id: z.string(), name: z.string(), status: z.enum(['running', 'stopped']) });
app.openapi(
createRoute({
method: 'get',
path: '/api/vms',
responses: { 200: { description: 'Servers', content: { 'application/json': { schema: z.array(Vm) } } } },
'x-rungent': { name: 'list_vms', description: 'List cloud servers (VMs) and their status.' },
}),
async (c) => c.json(await listVms(c.var.user), 200),
);
app.openapi(
createRoute({
method: 'post',
path: '/api/vms/{vm_id}/stop',
request: { params: z.object({ vm_id: z.string() }) },
responses: { 200: { description: 'Stopped', content: { 'application/json': { schema: Vm } } } },
'x-rungent': {
name: 'stop_vm',
description: 'Stop a running cloud server (VM).',
effect: 'update',
resolve: { vm_id: { op: 'list_vms' } },
confirmation: { title: 'Stop server {vm_id}?' },
},
}),
async (c) => c.json(await stopVm(c.var.user, c.req.valid('param').vm_id), 200),
);
```
`GET` 是读操作,Agent 可以随意调用。写操作要等用户确认。有了 `resolve`,用户可以说「train-01」,而 API 要的是 `vm-42`。详见[目录](catalog.md)。
## 告诉 rungent 谁在登录
一个带 `role: 'identity'` 的操作告诉 rungent 这是谁的请求。rungent 用用户自己的 Cookie 或 `Authorization` 头调用它,所以你的认证中间件照常应答。
```ts
app.openapi(
createRoute({
method: 'get',
path: '/api/me',
responses: { 200: { description: 'Me', content: { 'application/json': { schema: z.object({ subject: z.string(), tenant: z.string(), name: z.string() }) } } } },
'x-rungent': { name: 'whoami', role: 'identity' },
}),
(c) => c.json({ subject: c.var.user.id, tenant: c.var.user.orgId, name: c.var.user.name }, 200),
);
app.doc31('/api/openapi.json', { openapi: '3.1.0', info: { title: 'Cloud Console', version: '1' } });
```
## 挂载 rungent
`createRungent` 返回一个 Web 标准的 `fetch` 处理函数。把你应用自己的 `fetch` 交给它,这样它对你 API 的调用都留在进程内。
```ts
// src/server.ts
import { serve } from '@hono/node-server';
import { createRungent, SqlStore } from 'rungent';
import { importSigningKey } from 'rungent/delegation';
import { postgresDriver } from 'rungent/sql/postgres';
import { app } from './api';
const origin = 'https://console.example.com';
const rungent = createRungent({
url: origin,
host: { origin, openapi: '/api/openapi.json', fetch: app.fetch },
signingKey: await importSigningKey(JSON.parse(process.env.RUNGENT_SIGNING_KEY!)),
secret: process.env.RUNGENT_SECRET!,
store: new SqlStore(postgresDriver(process.env.DATABASE_URL!)),
models: { chain: [{ id: 'main', provider: 'openai', model: 'gpt-4.1-mini', apiKey: process.env.OPENAI_API_KEY }] },
});
for (const path of ['/rungent/v0/*', '/mcp', '/skill.md', '/llms.txt', '/.well-known/rungent-keys.json']) {
app.all(path, (c) => rungent.fetch(c.req.raw));
}
serve({ fetch: app.fetch, port: 3000 });
```
签名密钥生成一次,存进 secret;公钥部分交给你的 API:
```bash
npx rungent keys generate --kid rungent-2026-11 -o rungent-2026-11.private.jwk
openssl rand -base64 48 # RUNGENT_SECRET
```
rungent 在第一次请求时建好自己的 `rungent_*` 表。开发时用 `MemoryStore` 和 `generateKeyPair('dev')` 生成的密钥,这两步都可以省掉。Express、Workers 和 Python 见 [JavaScript 宿主](javascript.md)和 [Python 与其他技术栈](python.md)。
## 校验断言
rungent 发出的每次调用,都在用户凭据旁边带一个 `Rungent-Assertion`。你的 API 检查它是 rungent 为这个请求、这个用户、这个操作签发的;如果是写操作,还要检查用户已经确认:
```ts
// src/rungent-call.ts
import { ASSERTION_HEADER, AssertionError, checkCall, importPublicKeys, verifyAssertion } from 'rungent/delegation';
import { createMiddleware } from 'hono/factory';
import type { User } from './api';
const keys = await importPublicKeys([JSON.parse(process.env.RUNGENT_PUBLIC_JWK!)]);
const seen = new Map(); // jti → 过期时间;多进程时用 Redis 或 KV
export const rungentCall = (op: string, approval: 'never' | 'always') =>
createMiddleware<{ Variables: { user: User } }>(async (c, next) => {
const token = c.req.header(ASSERTION_HEADER);
if (!token) return next(); // 来自你界面的普通请求
try {
const claims = await verifyAssertion(token, {
keys,
audience: 'https://console.example.com',
request: { method: c.req.method, url: c.req.url, body: new Uint8Array(await c.req.raw.clone().arrayBuffer()) },
remember: (jti, until) => !seen.has(jti) && Boolean(seen.set(jti, until)),
});
checkCall(claims, { subject: c.var.user.id, tenant: c.var.user.orgId, op, approval });
} catch (error) {
if (error instanceof AssertionError) return c.json({ error: 'rungent_assertion_invalid', code: error.code }, 401);
throw error;
}
return next();
});
```
给 `stop_vm` 加上 `middleware: [rungentCall('stop_vm', 'always')]`,给 `list_vms` 加上 `rungentCall('list_vms', 'never')`。每项检查防的是什么,见[以用户身份调用](acting-as-the-user.md)。
## 打开面板
在 Web 应用的根布局里挂一次面板,用户在页面之间切换时它一直都在:
```tsx
// web/RootLayout.tsx
import { createClient } from 'rungent/client';
import { RungentDock, RungentProvider } from 'rungent/react';
import 'rungent/react/styles.css';
const client = createClient();
export function RootLayout({ children }: { children: React.ReactNode }) {
return (
{children}
);
}
```
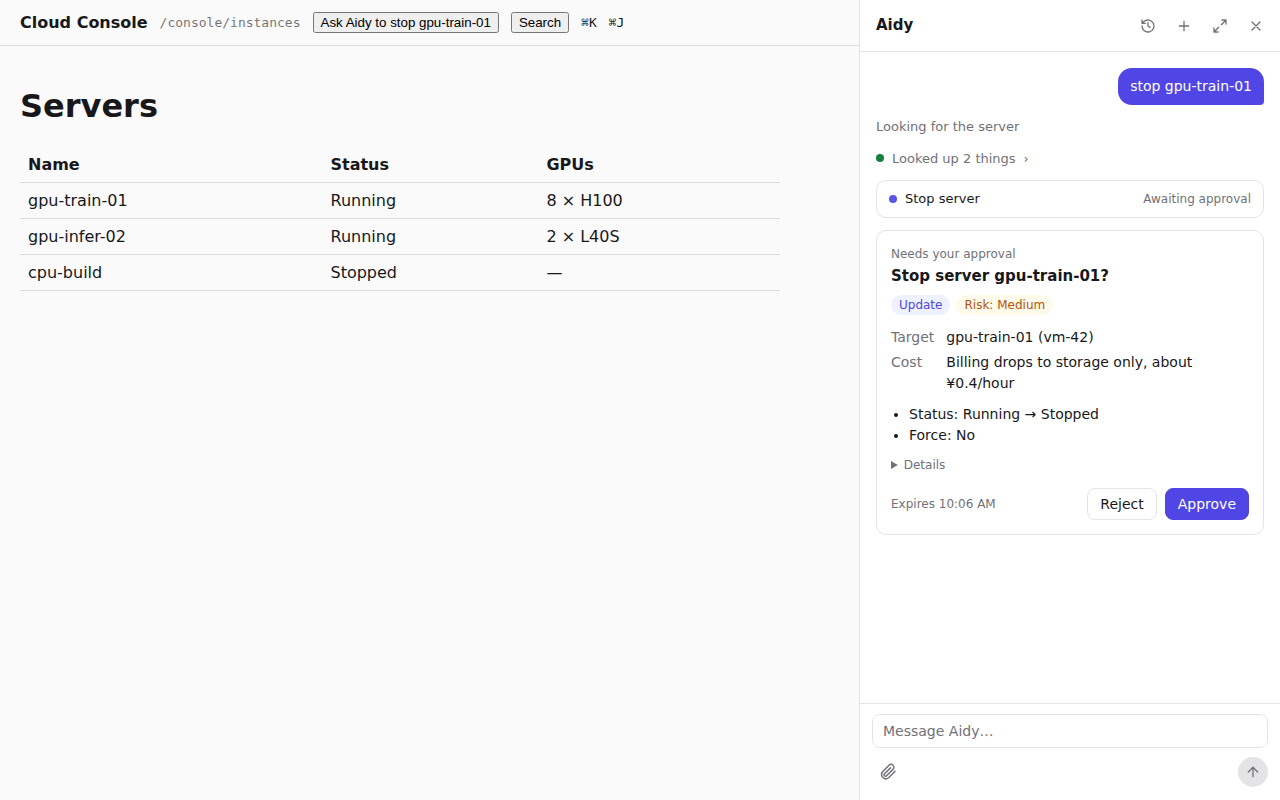
按 ⌘J,输入「stop train-01」。rungent 以你的身份查到 `vm-42`,弹出一张标题为「Stop server vm-42?」的卡片,你确认之后才调用你的 API。
## 接下来
- [表单与确认](forms-and-approvals.md):在对话里打开你页面自己的创建表单。
- [搜索与知识](search.md):根据你的文档作答,并附上引用。